
How to Share PDFs in an Online Class Without Screen Sharing
Most teachers share a worksheet in an online class the way they learned on Zoom. They open the PDF on their laptop, press share screen and pick the window. It works, but every student is watching a video of your screen, and your laptop has to produce that video for the whole hour.
The better way to share a PDF in an online class is to share the file itself. Each student’s device opens the pages, so the text stays sharp, everyone can draw on the same page, and your laptop has much less to do. This guide shows how to do that in Sonacove Meets, and how the content library means you only upload a file once.
How do you share a PDF in an online class without screen sharing?
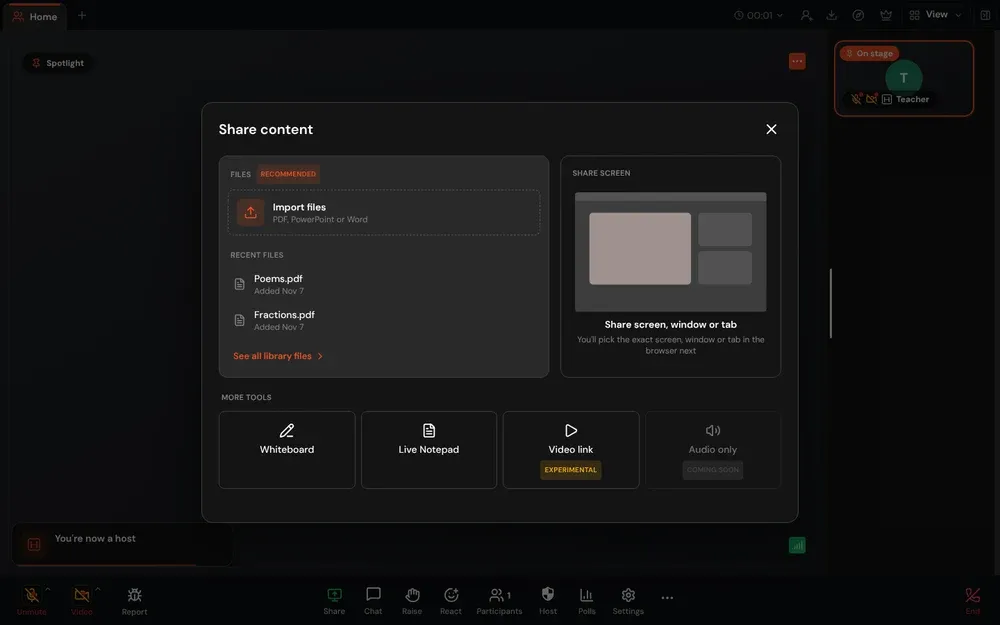
Open Share content and choose a file under Files, not Share screen. You can import a PDF, PowerPoint or Word file, or pick one from your library. It opens as a tab for everyone in the meeting, and the class turns the pages with you.
A few things to know about the Files side:
- Import files takes a PDF directly. PowerPoint, Word and OpenDocument files are converted to PDF on our servers first. Spreadsheets are not converted.
- Choose the pages. When you import a file during class, you can tick only the pages you want and drag them into a new order. Only the pages you keep are shared.
- Recent files lists your last few files, so last week’s worksheet is one click away. See all opens your whole library.
- Files open as tabs at the top of the meeting, beside Home, your video grid.
Anyone in the meeting can download a shared file, so don’t share a page you would not hand out on paper.
Why is sharing a file better than sharing your screen?
A screen share turns your screen into a live video, through the browser’s Screen Capture API. Your computer has to encode that video the whole time it runs, and students receive a compressed picture of your page. Sharing the file sends the document once. After that, each device draws the pages itself.
Here is the difference in practice:
| Screen share | Share the file | |
|---|---|---|
| What students receive | A video of your screen | The document |
| Text quality | Depends on their connection, and small text blurs | Sharp at any zoom, on any device |
| Work for your laptop | Encoding video for the whole share | Showing the page you are on |
| Student zoom | Only what you zoom | Each student can zoom up to 300% |
| Drawing on the page | Annotation over the video | Shared drawing on the page itself |
| Student cursors | Not shown | Each person’s cursor, with their name |
| Where students are | Unknown | Which page each student is on |
| What else students see | Pop-ups, other tabs, your desktop | Only the document |
The laptop cost is the part teachers notice last and feel most. We measured it ourselves in September 2026. On an M2 MacBook Air, a screen share normally uses about 13% of one processor core to encode. When the computer can’t use its hardware video encoder and falls back to software encoding, that rises to about 68% of a core, and the share drops from 15 frames a second to about 9. In the desktop app on Windows, that fallback happened on about 27% of screen shares we looked at.
That is the hidden reason a laptop fan gets loud halfway through a lesson, or your own video starts to stutter while you share. A document tab doesn’t run a video encoder at all.
Worth knowing: a screen share shows whatever is on that screen or window. A chat notification, a second tab or a message preview can land in front of 25 students. A shared file can only show the file.
What can students do on a shared PDF?
Students see the page you are on and can draw on it with you. Every mark is shared live, and every person’s cursor shows with their name. You can ask a student to circle the answer, underline the verb or label the diagram, and the whole class watches it happen on the same page.
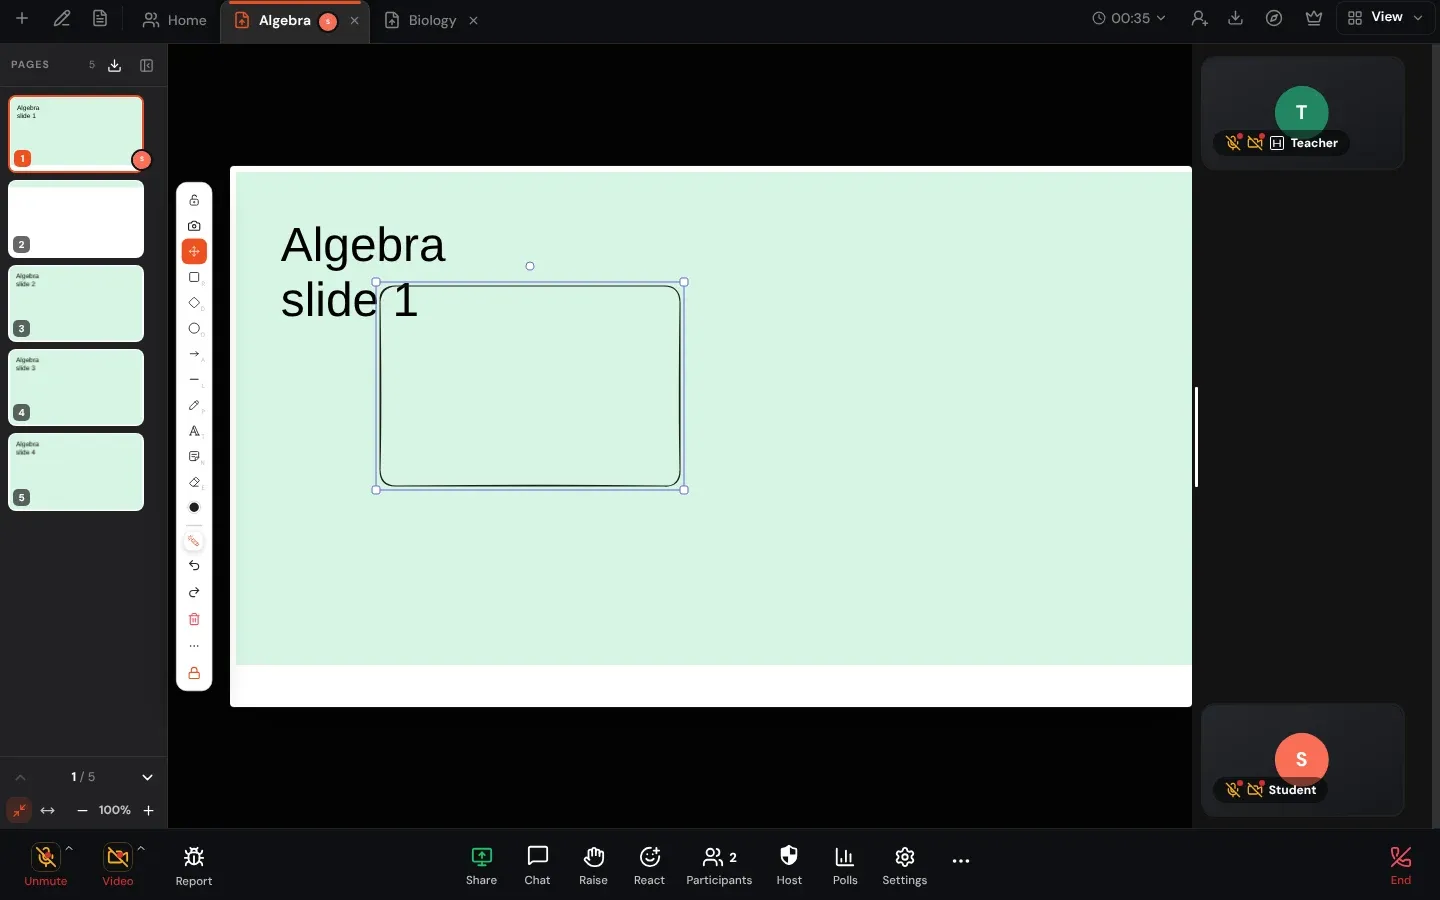
The tools beside the page are the same ones as on the online whiteboard: pen, shapes, arrows, text, sticky notes and an eraser. Two settings matter in a real class:
- Protect each person’s marks. Turn on “Let people erase only their own drawings” and a student can’t wipe out a classmate’s answer, or yours.
- Restrict drawing. As the host you can stop students drawing altogether, for the part of the lesson where you want them watching.
Students can also zoom in, fit the page to their screen, or jump back a page to copy something down.
How do you keep the whole class on the same page?
Turn on Leading Mode. Everyone then follows your tab and your page, and when you move to page 5 the class moves with you. Add Lock to my tab and students can’t wander off to other tabs, which helps with younger classes.
Without Leading Mode, students can browse the document freely, and that is often what you want during reading time. You still know where they are:
- You see a line such as “3 of 12 are on another page”, with Bring everyone here, which turns on Leading Mode in one click.
- A student who has drifted sees “You’re on page 6, host is on page 2”, with a Back to host button.
- The page list marks who is on each page, so you can see that half the class is still on the question you set.
A screen share has no equivalent, because there is only one copy of the page, and it is yours.
How do you see which students are distracted?
Turn on Distraction alerts from the moon in the top bar, next to the crown. About three seconds after a student hides the class tab or switches to another app, a moon appears on their tile, and you get a private alert if they stay away. Alerts are off at the start of every class, and the feature is marked Experimental.
A shared document adds the signal alerts cannot give you. A student who has flipped back to page 2 still has the class in front of them, so they get no moon, but the page list and “3 of 12 are on another page” show you exactly that. Together they answer both questions: is the student in the class, and are they on the page you are teaching. Our guide on how to tell if students are distracted in online class covers the timings, what students see and how to use alerts fairly.
How does the content library save you from uploading files every lesson?
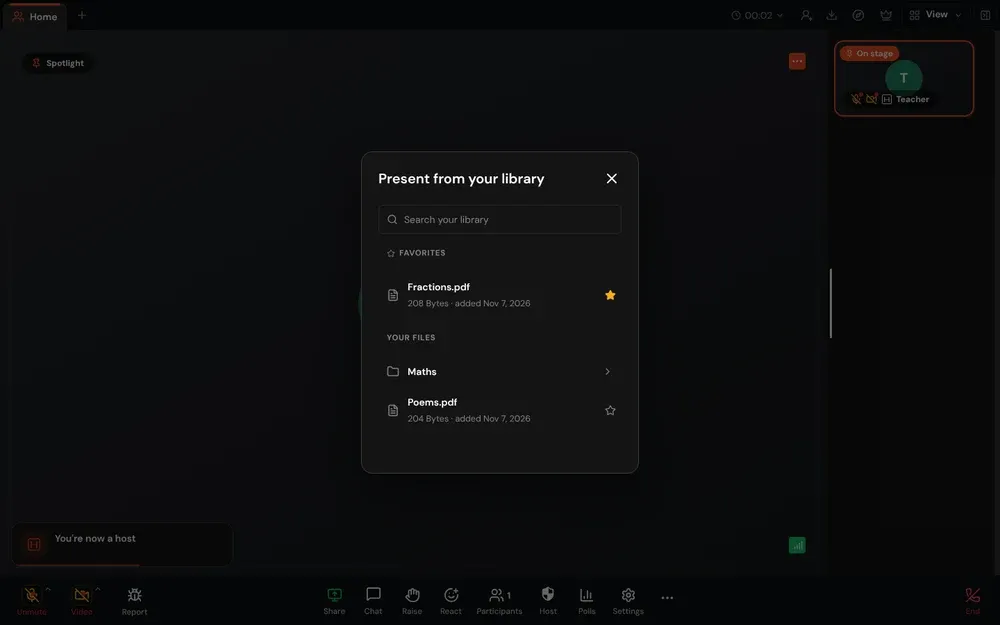
Every file you present in a meeting is saved to your library automatically, when you are signed in. You can also upload files from the dashboard before class. Next lesson, the file is in Recent files or in the library picker, and opens without uploading again.
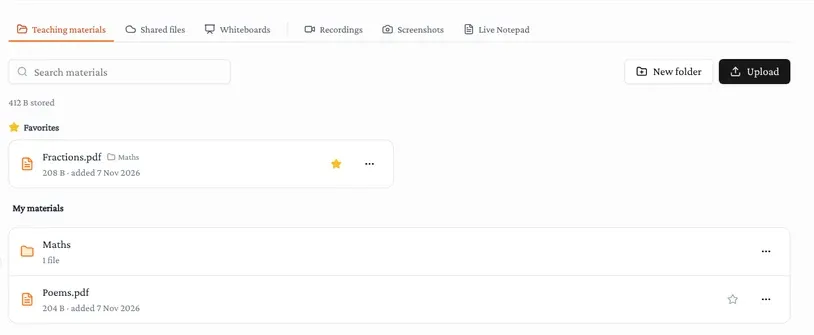
Library, then Teaching materials, in the dashboard is where you organise them:
- Folders. Make a folder per subject, class or unit. Folders can sit inside folders, up to five levels deep.
- Favorites. Star the files you use every week. They sit at the top of your materials and of the picker in class.
- Recently used. Your last five presented files, counted from your own lessons, not a colleague’s.
- Upload ahead. A PowerPoint can take a moment to convert. Upload it the evening before and it is ready when class starts.
- Big files. The dashboard takes files up to 1 GB and picks up an interrupted upload where it stopped.
In the meeting, See all opens Present from your library, where you can search, browse your folders and star files mid-lesson.
How do teachers in the same school share materials?
Through your school’s Library. It belongs to the school, its admins fill it and arrange it in folders, and every teacher there can present from it, so a department keeps one set of worksheets instead of everyone keeping their own copy. Teachers can also share their own files with each other, one file at a time.
How it works in a staffroom:
- The school’s Library. It appears under your school’s name, such as “Demo Academy Library”, in the dashboard and in the meeting picker. Only admins add, file and remove its files, and the files stay when the admin who added them leaves.
- Share with teachers. On a file of your own, choose Share with teachers, and every teacher at your school finds it under Shared by teachers with your name on it. Nothing is shared until you choose to.
- Copy to My materials. If a Library file or a colleague’s file is useful to you, copy it into your own materials. It is yours to file and keep, and it stays if the original is removed.
- Attach a file to a class. On a class page, attach the materials for that class. They lead the picker under For this class when the lesson starts.
- Moving a school over. If your school has a folder of existing worksheets and decks, we can import the whole folder into its Library, with the subfolders kept as Library folders.
When should you still use screen share?
Use screen share when the thing you are teaching is the software itself. A demonstration of a website, a coding editor, a spreadsheet formula or a simulation needs your real screen, because there is no file to hand over. Screen share is the right tool there, and it remains one click away in the same dialog.
For anything that is a document (a worksheet, a past paper, a reading, a slide deck, a diagram) share the file. If a lesson needs both, open the document for the reading and switch to screen share only for the demonstration. Sonacove shows one shared thing at a time by default, so students always know where to look.
What should you prepare before a class that uses PDFs?
Set it up the evening before, not in the first five minutes of the lesson. Get the file into your library, decide what students may draw, and know which pages you will use.
- Files uploaded to Library, then Teaching materials, the day before, so decks have time to convert
- This week’s files starred, or attached to the class on its class page
- A folder per class or unit, so next term starts with everything in place
- Only the pages you need, so students can’t skip ahead to the answers
- A decision on drawing: free for all, own marks protected, or host only
- Leading Mode on for teaching, off for reading time
- Screen share kept for the parts that are a live demonstration
Related reading
- Online whiteboard for teaching, for lessons built on a blank page rather than a worksheet
- How to keep students engaged in online classes, for what to change when students drift
- How to set up a virtual classroom, for the first-session setup this builds on
- Sonacove Meets features, for the tools that sit alongside shared files